Thursday, 28 March 2013

Week 4, Part 1 – Bonus Bake!

Leftover Meringue Nests

Easter is almost upon us, so I wanted to celebrate the fact that for secular folk, we basically have a long weekend dedicated to eating chocolate.  My baking for this week will thus be Easter-inspired.  As a result I intend to bake on Easter Sunday itself, but I feel it’s a long time for y’all to wait, so I wanted to write an almost bonus blog, which is great, as when I made last week’s Boston Cream Cake, I had a bonus bake!
As you may remember from last week’s entry, to make the custard filling I had to use 3 egg yolks.  As a result I had 3 egg whites leftover.  So I thought I would try making meringue!  I knew this would be a good challenge, as making and baking meringues always look scary when I’ve seen them on tv.  Alas, this is not the case!  I googled ‘meringues 3 egg whites’, and used a combination of google results and my mother to see what to do.
Firstly I whisked the egg whites until they were stiff, and even did the holding the bowl upside down over my head trick.  Next I added caster sugar – according to Delia Smith you need 50g for each egg white, so 150g was required.  Unfortunately the Boston Cream Cake cleaned me out of caster sugar, so I only had just over 100g left, but I thought it’d be ok as the eggs were quite small. I added the sugar gradually (ish) as well as a pinch of salt.  I whisked and whisked, trying to get the soft peaks to form, however it had become quite runny (I think I may have over-whisked).  I was short on time though, so had to put up with it.  I spooned 9 blobs of meringue onto a lined baking tray, then followed Delia’s advice of putting it into an oven that had been pre-heated to 150c then turned down to 140c immediately after the tray went in.  I set the timer for 1.5 hours, so that the oven would turn off after that time, and the meringues would stay in the oven until it was stone-cold.  I returned 3 hours later to find perfect looking meringues!  I was so proud.  I then coated the flat side in leftover, re-melted ganache, whisked the leftover double cream, and made a meringue sandwich, just like the ones I love from Marks & Spencer.  However, dare I say it, these tasted better than M&S’s!  Crunchy on the outside, but marshmallow-y in the middle.  What a great use of leftovers.
 
Tune in Sunday for this week's other bake!

Saturday, 23 March 2013

Week 3 - Bake fest!

Banana Boston Cream Cake


This week’s choice came from sitting in a supermarket car park on my lunch hour, knowing I had to pick something quickly as I had to hurry up and buy the ingredients!  So I flicked through, and came across the Banana Boston Cream Cake.  This seemed a good choice as I’ve been looking at holidays to Boston this week - I want to see those pretty Autumn leaves, damnit!  I also love the taste of the Boston Cream Cake donuts they sell in the supermarket.  I probably should’ve looked more thoroughly at the recipe before deciding on it, as the method actually covers two pages, and I only had three hours to make it (which is a long time really, but I’m a leisurely baker), so I was on quite a strict schedule.  This cake has three elements to it essentially – the sponge, the custard/cream filling, and the chocolate ganache topping.  I hadn’t made custard or ganache before, so this was going to be a learning experience for me, good or bad!

The Bake

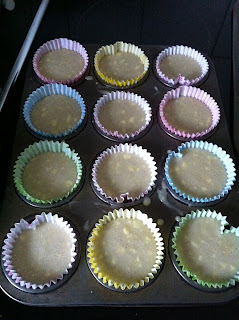
This week, my amendments to the recipe were limited to using margarine instead of butter, and skimmed milk instead of whole in the custard.  The sponge mix is a pretty simple vanilla sponge recipe, but with the addition of a mashed banana, and sour cream, which is then divided into two sponge tins and baked for 25-35 minutes.  While that bakes, you make the custard.  Whenever I’ve seen chefs making custard on tv, as well as using egg yolks, they’ve put in a whole vanilla pod, but luckily this one called for vanilla extract.  Simples. 
While milk and vanilla boils in a pan, you create a paste, with egg yolks.  Normally if I see that a recipe includes separating eggs, I’ll just not make it, however I do now have a very cute egg separator (see below).  You crack the egg into the chick, and then the egg white comes out of his mouth, leaving the yolk inside.  This sounds a bit weird now I’m seeing it in black and white.  It worked fine, but it was a bit laborious, and some of the yolk just refused to come out of the chick, so for the other two eggs required I had the confidence to separate them myself, just by transferring the yolk from one part of the shell to the other.  Once the milk has boiled you add the paste, then keep whisking until the mixture takes on custardy consistency.  You then pour the custard onto a baking tray (I used a brownie tin as the baking tray still had roast potato traces on it…) and cover it with cling film to cool.  Once the sponges and the custard has cooled, you whisk the custard until it’s smooth, sandwich it between the sponges, and refrigerate for 45 minutes.  I think I over whisked the custard, as it had become quite runny, and started going over the sides, so I didn’t use all of it.
While the cake cools, you make the ganache.  Last September I went to the inaugural Cake and Bake Show in Earl’s Court, London, and they had quite a few cooking demonstrations from celebrity bakers.  A common theme they had was making ganache for covering cakes, and it certainly looked impressive when they made it.  The Boston Cream Cake recipe instructed me to warm a pan of double cream until it was almost boiling, then add it to a bowl of chopped dark chocolate and stir until smooth and shiny.  And boy is it shiny!  It takes a lot of stirring, but the transformation is almost magical:
 
Once the cake has been in the fridge for 45 minutes, you put it on a wire rack over a baking tray (I used the brownie tin again, which I had washed, and I think this was better than a baking tray really as it’s much deeper), then start pouring the ganache over the cake.  The ganache was very clever in covering the cake, and only needed some teasing to cover some bits.  I think you’re meant to keep pouring the ganache over until you’ve used it all, however I thought that was it was covered, any extra would just drip down into the tin, so I just put it to one side.  I therefore think about half as much could’ve been made.
The effect of the ganache on the cake was beautiful – it’s so shiny you can almost see your reflection in it!  Once it had set, I took a big ol’ slice, and wasn’t disappointed with the taste – the sponge had a nice banana flavour, and the ganache was thick and smooth.  I think a thicker layer of custard in the middle would’ve made it even better.  So another success, however this recipe did take a long time, a lot of steps, as you can tell from such a long entry, and a lot of bowls/pans.
Happy Baking!

Thursday, 14 March 2013

Week 2 - still going!

Jaffa Cake Cupcakes


This week’s baking project didn’t start out too well – I intended to make a Chess Pie, and armed myself with a shopping list.  According to the recipe book, it’s a pie that isn’t generally heard of outside the deep American south.  Which means, turns out, its ingredients cannot be found in the supermarkets of the deep Welsh south.  I couldn’t find cornmeal or white vinegar (only white malt vinegar – is it different?  I didn’t want to find out the hard way), so I abandoned that recipe, and went for the first recipe in the book, Jaffa Cake Cupcakes.

About 5 years ago I bought a recipe book of 500 Cupcakes, then later the Hummingbird Bakery book Cake Days, so when it comes to cupcake recipes, I’ve seen ‘em all.  But the idea of creating an almost deconstructed Jaffa Cake was appealing, especially at the last minute.  These cupcakes consist of making an ordinary vanilla cupcake sponge, cutting out a piece of sponge from the top of the cake, filling it with orange marmalade, putting the sponge lid back on, covering the sponge with chocolate buttercream icing, and topping with a mini Jaffa Cake. 

The Bake

This time I only strayed from the recipe slightly, by using skimmed milk (1%) instead of the whole milk in the recipe.  I’ve done the same when making the cupcakes in Cake Days, and I can’t see any difference in bake/taste, except that it does make the mixture quite runny, so it takes a few spoonfuls to fill the case two-thirds.  What I will say, however, is make sure the butter is soft enough!  For sponge mixtures I would normally use Stork/margarine as it’s much cheaper than butter, and is always soft, however the butter had been out of the fridge a good six hours.  Unfortunately, due to the cold weather, the kitchen temperature is about the same as the fridge temperature, so the butter wasn’t quite soft enough, and the mixture was a bit lumpy…
 

The 16 sponges turned out perfectly, and while they were cooking I made the icing.  I even sifted the icing sugar and cocoa powder (I’m not generally a sifter). Seems the pressure of putting the results on the internet is making me up my game.  I always halve the quantities when I make frosting from my other Hummingbird recipe book, as the ratio of 500g of icing sugar to 12-16 cakes seems excessive.  So I used half of the amount of the recipe, except for the milk, which I used as was needed, as the 30ml I initially put it wasn’t enough to bind the icing sugar and butter.
 
Once the cakes had cooled, I cut out a small bit of sponge from the middle of the cupcake, filled it with almost a teaspoon of orange marmalade, put the top part of the cut out sponge back on top, then covered it with the buttercream.  I just use a knife to smooth the icing – I have yet to master piping!  The last step, of putting a mini Jaffa Cake on top, really finishes it off and makes it look like a statement cupcake, rather than an ordinary chocolate cupcake.  And they taste great!  Especially when you taste the sponge, marmalade and chocolate icing together – it really tastes like a Jaffa Cake.  I’m not a fan of marmalade, but with the sponge and icing you forget it’s marmalade, and just think it’s the Jaffa layer of the classic ‘is it a cake or a biscuit’ treat!  I will definitely be making these again.


Come back next week for my next bake – happy baking!

Monday, 4 March 2013

Conquering the blogosphere, one sweet treat at a time...


Welcome to my blog! Thanks for stopping by. I feel I’m coming to the whole blog thing about 10 years later than everybody else, but today seemed to be the first official day of spring (i.e. not absolutely freezing), and I feel inspired to write, and to share. I could just bake then put the pictures on Instagram like the rest of the world, but I want to go that extra self-indulgent step. This inspiration coincides with the fact that I bought a new baking book last week – the Hummingbird Bakery’s Home Sweet Home (hence my blog title). I’ll admit, the pretty pictures and recipe titles alone caused me to part with my money, but upon actually examining the recipes, some seem quite complex for my level of baking ability (vanilla cupcake, anyone?). So I feel like I need a way to make me at least try these multi-step, multi-cooking-equipment recipes, and what better way than the internet?! I am thus going to embark on a Julie-Julia type challenge, but on a more leisurely pace. I’m going to make one recipe from the book a week, then tell you all about it. I am in no way affiliated with the Hummingbird Bakery, and hope that I’m not breaking any laws/offending anyone by using their book as my bake-spiration (yep, I just wrote that). If the recipe turns out well, I’ll say, but if it’s a massive disaster, I’ll also pass it on. I won’t share the details of the recipes as I assume that is copyright infringement, but I’ll say if I’ve made any amendments. Which brings me to the first recipe, and the start of what I hope will be a fun, and most of all tasty, journey….

Monday 4 March 2013 - Basic Shortcakes

As already suggested by my intro, I’m a little bit lazy. So when flipping through the book looking for something to bake on my day off (before I decided to make this a “journey”), my requirements were 1. Simplicity and 2. Having the ingredients in the house. Tick and tick. The book describes them as spongy, American cakes that look like scones. I haven’t made scones before due to the fact I don’t have a rolling pin (a detail that I think will have to be rectified soon), but with this recipe you just pat it until it’s 2cm thick. Patting I can do.

Before I start, it turns out I don’t have as much flour as the recipe calls for, so I’m using half of everything in the recipe. I’m using gluten free flour and baking powder, as well as skimmed milk. I realise this must make me sound health conscious. I’m not, it’s just what was in the house.

The recipe was very simple to follow, however I did add a touch more milk as the ingredients didn’t seem to be binding. Here they are before going into the oven:


And 15 minutes (ish) later, voilĂ :


Looking at them now, I immediately realise I should've made them bigger! Despite them being quite small, I've still cut them in half. The book suggests having them with berries and cream, but to be objective I've tried one on its own, and one with jam. And the taste? Buttery and crumbly. As they're no doubt thinner than they should be, there is a little bit of a crunch, but with the jam it's almost a nice contrast. So I'll chalk this down as a success!

Happy Baking!